
Instrument training involves a lot of hand flying. Most of the airplanes these days (even Cessna 172s and Piper Archers) are equipped with autopilots, but it is vitally important during instrument training to know how to hand fly while scanning instruments. This is known as Basic Attitude Instrument Flying.
This is important for two reasons. First, the practical reason, is what happens if the autopilot fails in hard IFR? Those hand flying skills that your IFR instructor beat into you will suddenly become important (hint: to keep those hand flying skills up to snuff, make sure you hand fly a handful every few months). Second, a good pilot examiner will make an IFR applicant hand fly 80% of a check ride, so the scan is very important in order to receive an instrument rating.
One thing that pilots have a hard time with when hand flying instrument approaches is wind correction. If there is any sort of crosswind, and there is most of the time in most parts of the country, the final approach course is not the correct heading to fly to keep on course. Wind often shifts in speed and direction as the airplane descends, so constant heading corrections need to be made in order to stay on the correct course and see the runway when the clouds dissipate.
This often leads to what I call a “snake” approach. In a snake approach, the pilot gets off course, then overcorrects on the opposite side of the course needle, then the needle moves through center, then goes the opposite direction, and the same routine is followed. If breadcrumbs are turned on in Foreflight, look at the flight track after the approach and it looks like a snake.
Garmin has a really handy tool to help stay on course while hand flying an approach. It’s called the Flight Path Marker. I commonly refer to it as the Green Target. You have to have Synthetic Vision in order to utilize it, but it is a great tool. The Flight Path Marker shows what the airplane’s ground track is and also shows if the airplane is climbing and descending in relation to the zero pitch line. This is handy at high angle of attacks and low airspeeds since it’s hard to figure out what pitch attitude will hold an altitude at a specific airspeed.
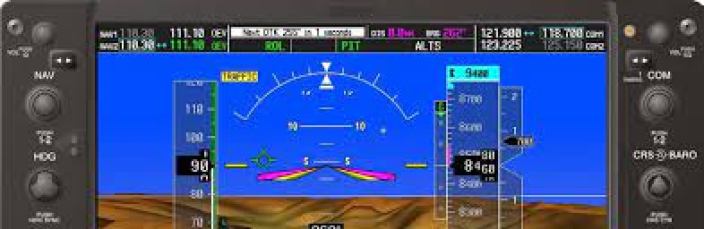
In the picture below, the Flight Path Marker is the green target to the left of the attitude indicator. In this picture, the Flight Path Marker is indicating that the ground track is to the left of the airplane’s heading.
How does this help on an instrument approach? Let’s take two examples, one with the Highway in the Sky (HITS) boxes on and one with the HITS boxes off.
HITS Boxes On
The Highway in the Sky boxes are the magenta or green boxes that display on Synthetic Vision whenever the navigation source is GPS (magenta boxes) or an ILS (green boxes). At first, these HITS boxes seem simple. Just keep the attitude indicator inside the boxes. This is easier said than done because crosswinds and updrafts and downdrafts cause the airplane to not fly straight. This leads to a snake approach since the pilot is moving the plane back and forth to try and stay in the boxes.
Using the Flight Path Marker in conjunction with the HITS boxes makes this really easy. Just keep the flight path marker inside the HITS boxes by making small corrections and you’ll stay on course and on glide slope without any issues.

HITS Boxes Off
I personally like to fly with the HITS boxes off, mostly because when I did my IFR training in a G1000 Cessna 172, Synthetic Vision didn’t exist and I don’t like the extra clutter. I also leave the HITS boxes off for the first 15 hours or so of IFR training for my customers so they don’t use them as a crutch because they do detract from a good scan (see note below).
With the HITS boxes off, when you have captured the glide path and the course needle is centered, simply put the Flight Path Marker on the numbers on the digital runway displayed on the Synthetic Vision and keep it there. While continuing to scan, if the airplane has minor deviations off the glide path or the final approach course, then simply make attitude adjustment to move the Flight Path Marker toward the glide path or course needle. Once everything is centered again, make another attitude adjustment to move the Flight Path Marker back to the numbers on the Synthetic Vision runway.
Note: Make sure to continue scanning the instruments, not just staring at the Flight Path Marker. The Flight Path Marker doesn’t tell anything about airspeed. Also, if ATC wants the pilot to fly a specific heading, then fly that heading based on the heading indicator, not the flight path marker.
AOA
No AOA in the airplane? No problem! The Flight Path Indicator can be a quasi-AOA. It won’t show the critical angle of attack, but it can definitely show high angles of attack, alerting pilots to use caution in those situations.
How to identify those high angle of attack situations? Simple. The greater the distance between the attitude indicator and the flight path marker, the higher the angle of attack. If the attitude indicator is at 10 degrees pitch up, but the Flight Path Marker is at the zero pitch line, then the angle of attack is quite high.
In the picture below, the pitch attitude is about 6 degrees while the Flight Path Marker is at about 3 degrees, showing the angle of attack is higher than the pitch attitude.

Emergencies
Last but definitely not least, the Flight Path Marker is an excellent tool when it comes to gliding to a runway. Most pilots that use Foreflight have the Glide Advisory turned on. If the engine fails, a quick glance down at the Glide Advisor makes picking an airport to glide to quite simple. Once the airplane is pointed at the airport, the Flight Path Indicator is very handy.
At best glide, if the flight path marker is touching the runway on the Synthetic Vision, the runway is made. If the Flight Path Indicator is past the runway, the plane is too high and flaps, gear, forward slipping or some combination of all three will need to be used. If the Flight Path Marker is showing short of the runway, the airplane is too low and another option will need to be decided on quickly for landing.
The Flight Path Marker has many uses, both for IFR and VFR pilots. It is available on any Garmin display that has synthetic vision as well as Aspen displays with Synthetic Vision. It’s an excellent tool to utilize for all pilots.